Post by squinch on Mar 10, 2014 16:26:30 GMT -5
Tim (Timvidlak) and I (Squinch) met last week at EndGame in Oakland and played a great game of Gruntz. We opted for a smaller game as we were both getting back into playing the rules. Tim, sorry it took so long to get this on the board. Great game BTW and I appreciate your demeanor and foresight in your game play.
The armies were as follows:
Defender (Tim)
Tigrid Commander Sht-6 Gd-13 Sk-16, Med plasma, Spec power Claw, Ult Agility
4x 4-Man Tigrid Warrior Squads Sht-4 Gd-12 Sk-13, Laser Rifle, Energy CCW, SA Med laser FA, Ult Agility
2x Light Grav Tanks Sht-5 Gd-12 Sk-16, Lt Vh Missle, Lt Vh Gatling, Spec Gatling
Attacker (Squinch)
Space Marine Commander Sht-6 Gd-13 Sk-14, Plasma Pist, Energy CCW, HE Gren, Melt Away
3x 4-Man Space Marine Squads Skl-5 Gd-12 Sk-14 Plas Rifle, Spec Power Claw, SA Med Laser, Auto-Heal
1x 3-legged Walker (Vehicle Spec) Skl-5 Gd-13 Sk-13 Spec Hvy Laser FA, Peregrine Stab
2x Scout Drones (Vehicle Spec) Skl-5 Gd-14 Sk-12 Spec Hvy Laser FA, Active Camo
1x Med Grav Tank Skl-5 Gd-11 Sk-17 Vh Med Projectile, 2x med proj FA, Advanced AI Target Acq
Interestingly, we didn’t build by points, I laid out a small attack force and Tim selected a defensive army. Tim’s perception was right on as he selected a force slightly under the attacker to make up for the hidden nature of his troops. The counter to this setup was uncertainty on which direction the aggressors would come from.
I may not have captured exactly which turn the action happened but I think the overall flow is accurate.
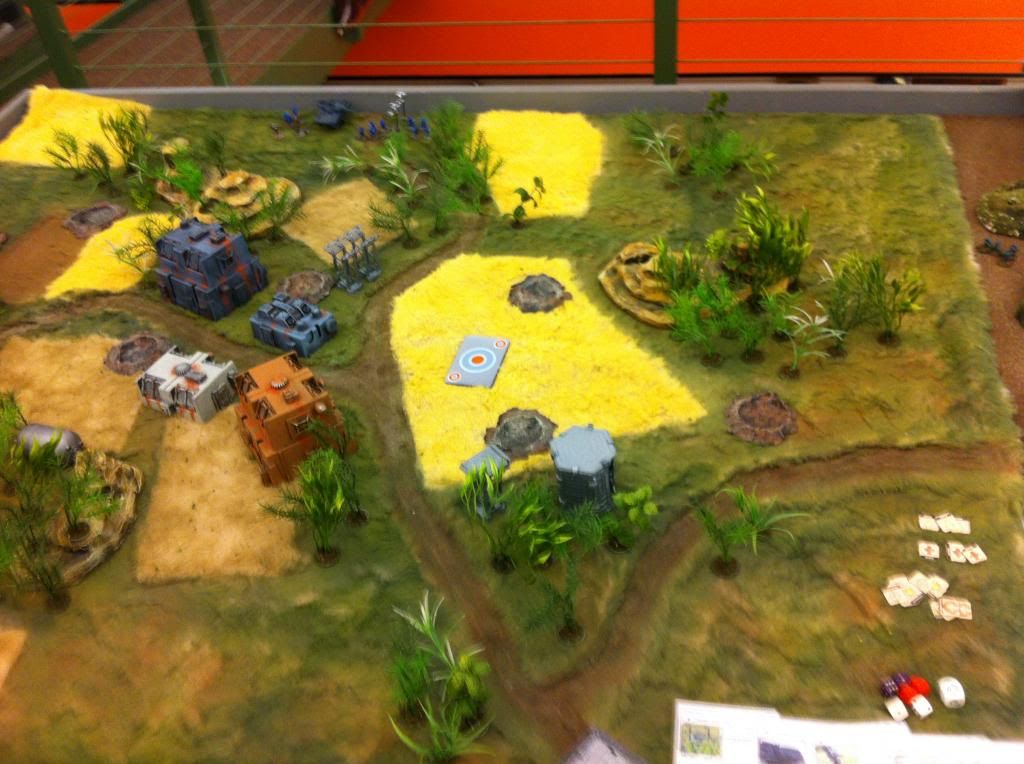
The layout was a small settlement on a rebellious Ag world that was recently on the receiving end of an orbital bombardment. Subsequent ground scans from the lower atmosphere indicated higher than expected residual life form readings so the Powers-That-Be decided a BDA was warranted. The Marines got the call.
The defenders started hidden but the entry point for attackers was unknown and eventually rolled at random.
Turn One:
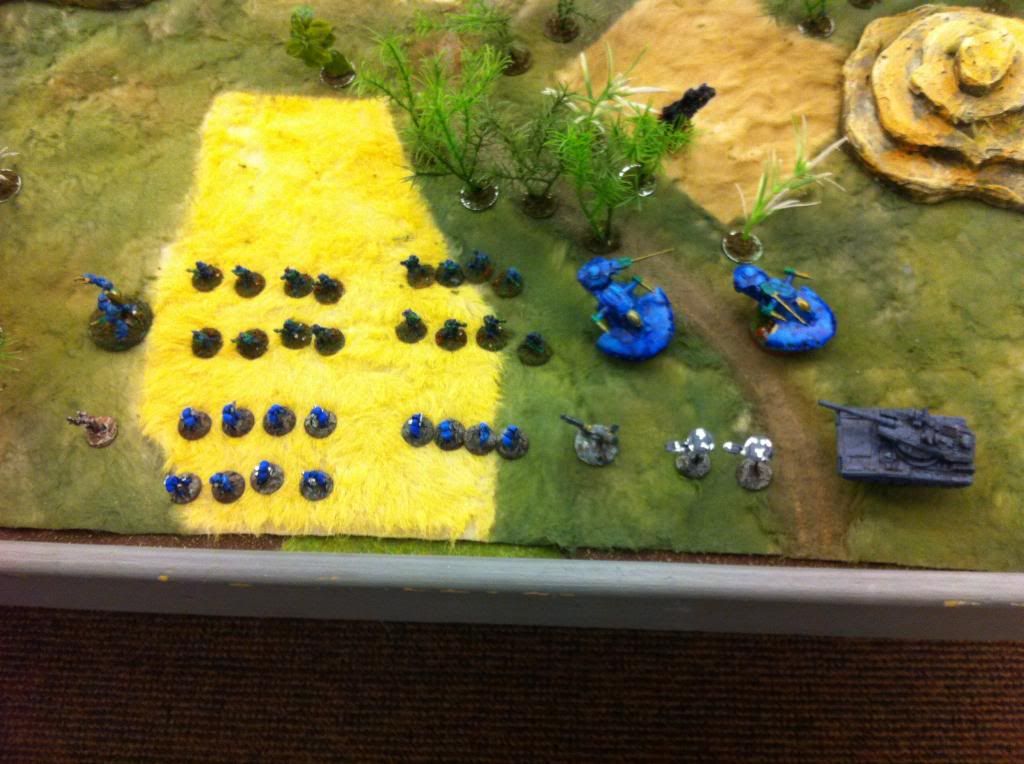
The marines scout drones drifted into positions on either side of the settlement and immediately spotted the source of the readings. The Tigrid commander and one tank were visible adjacent to the large structures.
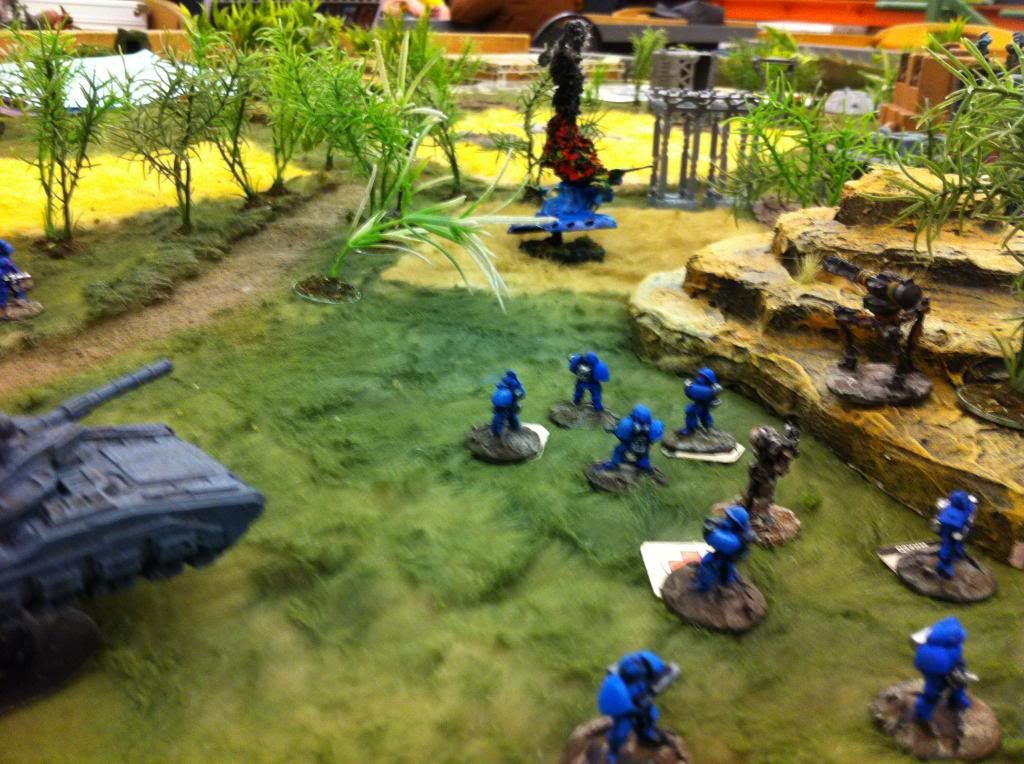
Next the Marine troops entered with one squad dropping prone for eventual cover fire and the rest making for cover at a nearby hill.
A small number of defending Tigrids opened up on the advancing troops.
The 3-legged walker advanced into cover supporting the Marines. Finally the Tank made entry and delivered a round into the Light Tank. The optics must have been jarred by the drop from orbit as the Marines had trouble hitting for much of the early engagement.
Turn Two
The Marines captured the initiative for much of the turn and almost all units moved first (I’m glad Tim shuffled otherwise I might have had some explaining to do).
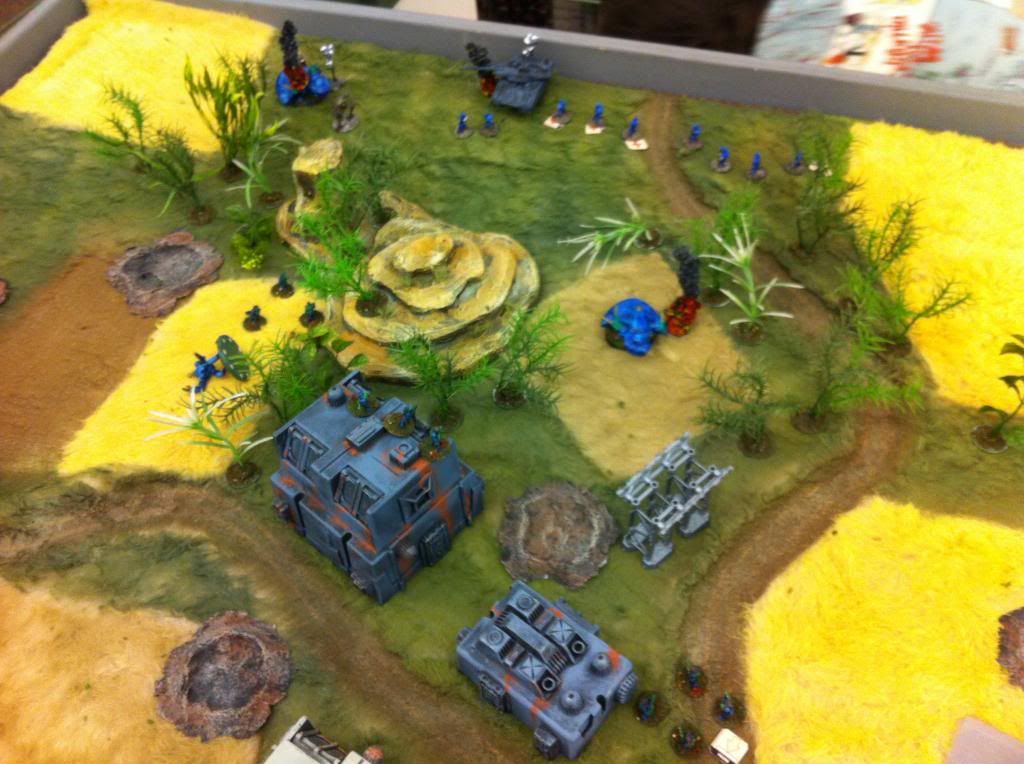
The Tigrids boldly moved a Light tank forward to engage the Medium tank and caused minor damage. In moving up it revealed a number of marines in the open making for the cover of the hill. Multiple gatling shots cut one squad in half and lightly wounded the Marine leader.
Unfortunately, in moving up, the tank entered a crossfire from the marine scouts and walker, ending the brief counterattack. The Tigrids pushed the attack with an infantry squad and were able finish of the Marine tank with a squad heavy weapon.
Turn Three
The Tigrid’s recovered their motivation as evidenced by almost all the defending units activating first (Good to see both sides get a turn like that) and moving forward.
A push move by the Tigrid leader caused the advancing light tank to plow through two Marine squads and the marine Commander. The Commander was busy yelling for the troops to move and ended up the only casualty, ending with minor damage.
The Tigrids general advance caused the Marines some concern and forced them to pull back lest they get caught in hand-to-hand in the cover where their concentrated firepower could not be brought to bear.
This pull back exposed two Marine squads and the Tigrid defenders made them pay, eliminating one squad entirely.
The reprieve was short lived though, as the marine commander recovered quickly and delivered a double tap to the rear of the over-running Tigrid tank. The last shot found a weak spot and destroyed the vehicle.
Turn Four
Motivated by the change in momentum, the Marines took action. The Marine walker, one drone and commander combined fire on the Tigrid Commander and dropped him. The nearby Tigrids remained stable, however, the Tigrids realized that pushing the counterattack had little to gain.
We called it there as only Tigrid troops remained and they faced a difficult challenge fighting a few of the Marine units. The game took a little over two hours.
Observations:
This was my first meeting and game with Tim. I was extremely pleased with how similar our views were on setting up and playing scenarios.
I would say the only hiccup in this game occurred due to the general stats of the attackers (too high) vs the defenders (my fault, sorry Tim). Point wise it was about +20% for the attackers with hidden defenders, which was about right. However, a few of the Marine stats, namely the drones’ guard (15 base), made it very difficult for the defenders to engage them. In one case a defending squad did a combined fire and almost destroyed one but the relatively high guard coupled with cover, etc made it a tough choice to keep attacking.
It does make a great case for larger squads as even a weakly armed skill-4 squad of 6-8 making a combined shot starts to command respect even with a 15-16 guard target. A skill-4 unit, prone making a combined fire at +3 only needs a 7 to hit a 16 guard unit.
All in all it was an enjoyable game and evening. Thanks Tim, looking forward to our next battle.
Squinch
The armies were as follows:
Defender (Tim)
Tigrid Commander Sht-6 Gd-13 Sk-16, Med plasma, Spec power Claw, Ult Agility
4x 4-Man Tigrid Warrior Squads Sht-4 Gd-12 Sk-13, Laser Rifle, Energy CCW, SA Med laser FA, Ult Agility
2x Light Grav Tanks Sht-5 Gd-12 Sk-16, Lt Vh Missle, Lt Vh Gatling, Spec Gatling
Attacker (Squinch)
Space Marine Commander Sht-6 Gd-13 Sk-14, Plasma Pist, Energy CCW, HE Gren, Melt Away
3x 4-Man Space Marine Squads Skl-5 Gd-12 Sk-14 Plas Rifle, Spec Power Claw, SA Med Laser, Auto-Heal
1x 3-legged Walker (Vehicle Spec) Skl-5 Gd-13 Sk-13 Spec Hvy Laser FA, Peregrine Stab
2x Scout Drones (Vehicle Spec) Skl-5 Gd-14 Sk-12 Spec Hvy Laser FA, Active Camo
1x Med Grav Tank Skl-5 Gd-11 Sk-17 Vh Med Projectile, 2x med proj FA, Advanced AI Target Acq
Interestingly, we didn’t build by points, I laid out a small attack force and Tim selected a defensive army. Tim’s perception was right on as he selected a force slightly under the attacker to make up for the hidden nature of his troops. The counter to this setup was uncertainty on which direction the aggressors would come from.
I may not have captured exactly which turn the action happened but I think the overall flow is accurate.
The layout was a small settlement on a rebellious Ag world that was recently on the receiving end of an orbital bombardment. Subsequent ground scans from the lower atmosphere indicated higher than expected residual life form readings so the Powers-That-Be decided a BDA was warranted. The Marines got the call.
The defenders started hidden but the entry point for attackers was unknown and eventually rolled at random.
Turn One:
The marines scout drones drifted into positions on either side of the settlement and immediately spotted the source of the readings. The Tigrid commander and one tank were visible adjacent to the large structures.
Next the Marine troops entered with one squad dropping prone for eventual cover fire and the rest making for cover at a nearby hill.
A small number of defending Tigrids opened up on the advancing troops.
The 3-legged walker advanced into cover supporting the Marines. Finally the Tank made entry and delivered a round into the Light Tank. The optics must have been jarred by the drop from orbit as the Marines had trouble hitting for much of the early engagement.
Turn Two
The Marines captured the initiative for much of the turn and almost all units moved first (I’m glad Tim shuffled otherwise I might have had some explaining to do).
The Tigrids boldly moved a Light tank forward to engage the Medium tank and caused minor damage. In moving up it revealed a number of marines in the open making for the cover of the hill. Multiple gatling shots cut one squad in half and lightly wounded the Marine leader.
Unfortunately, in moving up, the tank entered a crossfire from the marine scouts and walker, ending the brief counterattack. The Tigrids pushed the attack with an infantry squad and were able finish of the Marine tank with a squad heavy weapon.
Turn Three
The Tigrid’s recovered their motivation as evidenced by almost all the defending units activating first (Good to see both sides get a turn like that) and moving forward.
A push move by the Tigrid leader caused the advancing light tank to plow through two Marine squads and the marine Commander. The Commander was busy yelling for the troops to move and ended up the only casualty, ending with minor damage.
The Tigrids general advance caused the Marines some concern and forced them to pull back lest they get caught in hand-to-hand in the cover where their concentrated firepower could not be brought to bear.
This pull back exposed two Marine squads and the Tigrid defenders made them pay, eliminating one squad entirely.
The reprieve was short lived though, as the marine commander recovered quickly and delivered a double tap to the rear of the over-running Tigrid tank. The last shot found a weak spot and destroyed the vehicle.
Turn Four
Motivated by the change in momentum, the Marines took action. The Marine walker, one drone and commander combined fire on the Tigrid Commander and dropped him. The nearby Tigrids remained stable, however, the Tigrids realized that pushing the counterattack had little to gain.
We called it there as only Tigrid troops remained and they faced a difficult challenge fighting a few of the Marine units. The game took a little over two hours.
Observations:
This was my first meeting and game with Tim. I was extremely pleased with how similar our views were on setting up and playing scenarios.
I would say the only hiccup in this game occurred due to the general stats of the attackers (too high) vs the defenders (my fault, sorry Tim). Point wise it was about +20% for the attackers with hidden defenders, which was about right. However, a few of the Marine stats, namely the drones’ guard (15 base), made it very difficult for the defenders to engage them. In one case a defending squad did a combined fire and almost destroyed one but the relatively high guard coupled with cover, etc made it a tough choice to keep attacking.
It does make a great case for larger squads as even a weakly armed skill-4 squad of 6-8 making a combined shot starts to command respect even with a 15-16 guard target. A skill-4 unit, prone making a combined fire at +3 only needs a 7 to hit a 16 guard unit.
All in all it was an enjoyable game and evening. Thanks Tim, looking forward to our next battle.
Squinch